[addon] Batch Processor

v 0.1

https://raw.githubusercontent.com/ChrisRaven/FlyWire-Batch-Processor/main/Batch-processor.user.js

This addon was previously a part of the Utilities addon.
I’ve decided to move the Actions menu to a separate addon, because it was growing to big. I also wanted to make it so, that if someone doesn’t want to use the whole Utilities addon (or it doesn’t work for them for some reason), could still use the actions.

However, there are some changes and a new, probably quite useful feautre:

  • I’ve moved the menu from the right panel to the top bar (to the left of the the “Undo” button). The reason for this was, because the right panel wasn’t a very reliable place for it and the menu sometimes dissapeared and one had to refresh the page to bring it back.
  • Added a new feature - ability to change color for groups of segments at the same time.


(ignore the “Test” word at the top)

For now, you can only change the color for the visible segments, but if there will be a need, I can add some/all the other categories.

4 Likes

changing the color for several segments at once would be nice. not sure if there would be a need to change it for the other groups in that list, maybe in some cases.
from where i am working i am seeing a need to change the colour for small groups of cells for instance one bundle of R -cells, so each bundle have a different colour (i do this to see where there are missing cells) if i could change colour for the whole bundle at once i could mark all that was finished in one color. Not sure how to best do this in a easy way, i have tried different soluttions like grouped annotations, manually adding different colours, a big ball for each completed group etc. But have not really found a good way to show that this 6 (8) cells belong together. Having a shortcut from the keybord to colour might maybe help, but not solving the group part.

i am also thinking that it would be beneficial when i get so far as to identify the cells, if i could colour all the cells marked as one type in the get cells list in one colour since the R- cells need too know what order the other cells are in too identify them.

3 Likes

This is amazing! Do you mind if I share it with the scientists?

1 Like

Yes, sure!
If that would help them doing their work faster, that’d be great.

1 Like

v 0.2

Fixed an issue with copying visible segments.
Added a large feature to find common synaptic partners for up to 10 selected cells and to find further synaptic partners of those common ones.

Warning: There are still many issues, that have to be ironed out, especially with the second part (finding partners for partners), but it’s already usable, that’s why I’m publishing it.

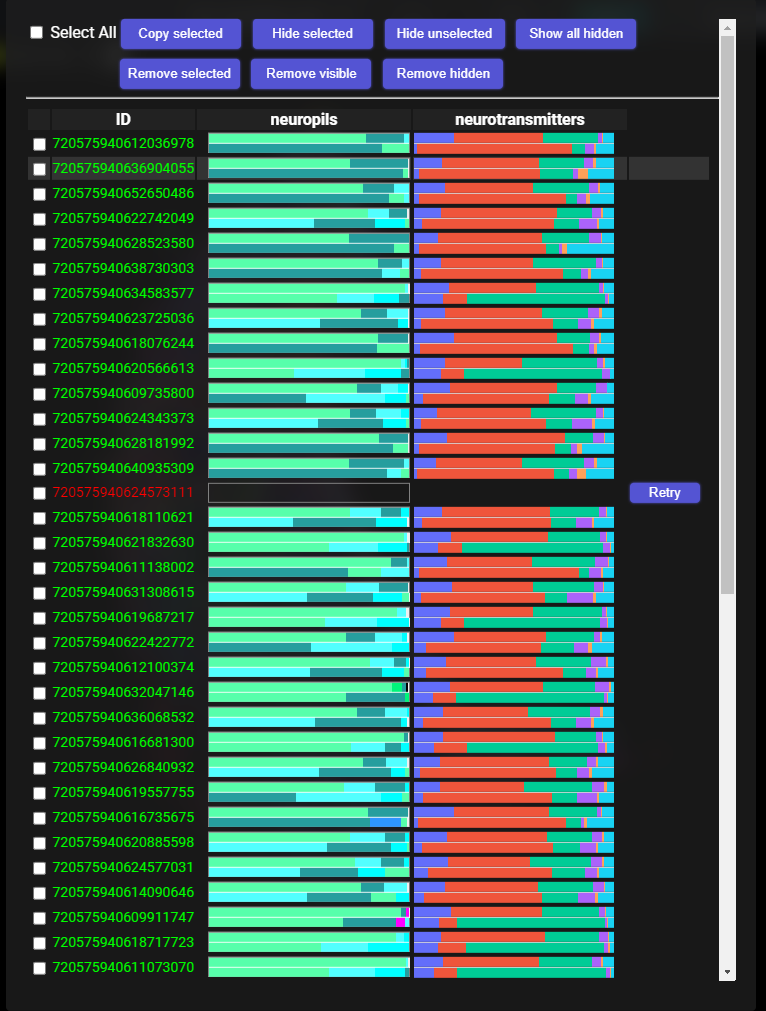
The first step to use this feature is to select up to 10 cells in the right panel. If you select more, the first 10 will be automically selected.

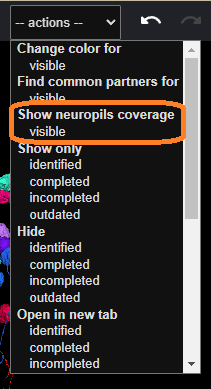
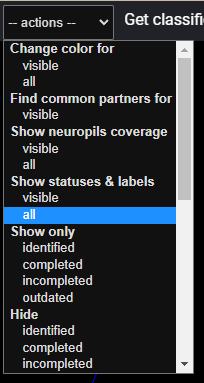
After that, click the appropriate option from the dropdown menu at the top:
Bez nazwy.png-mh

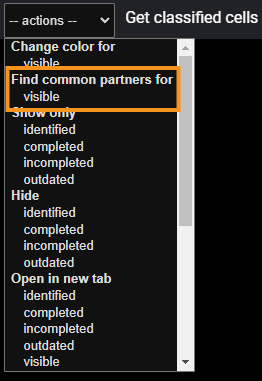
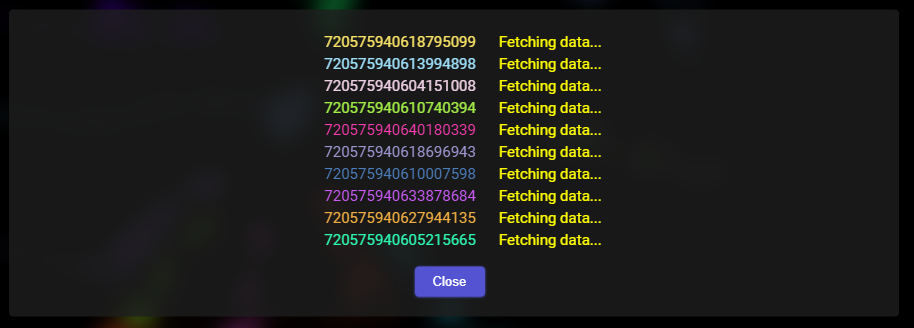
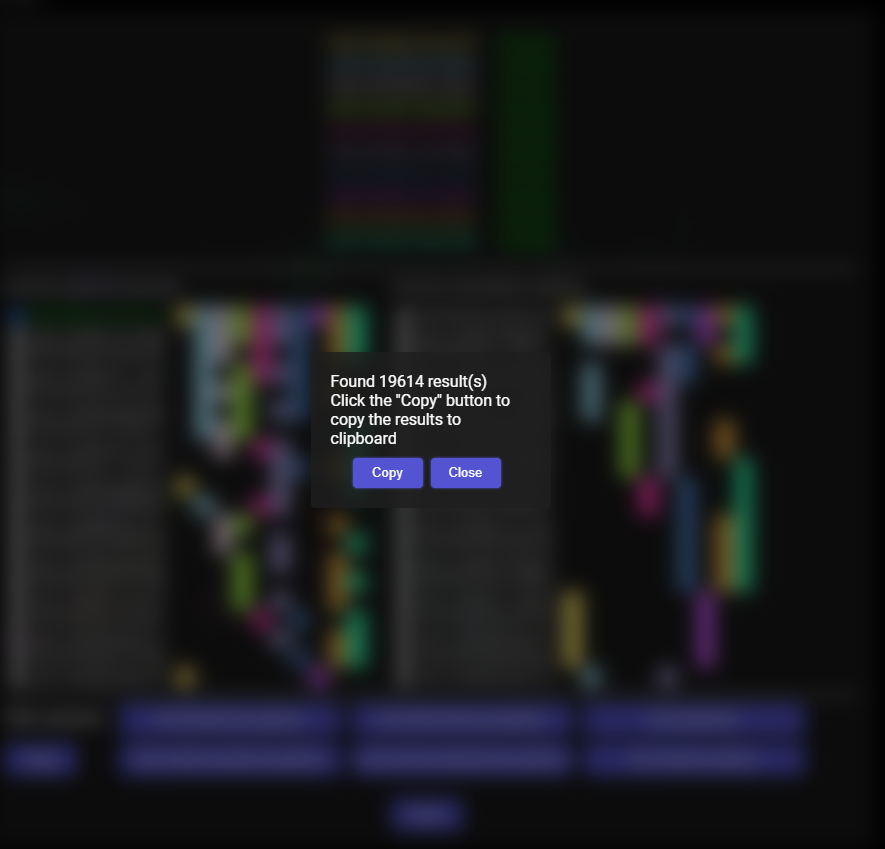
At the beginning you should see a dialog window similar to this one:

The addon is now retrieving all the necessary data from the Connectivity app’s API.
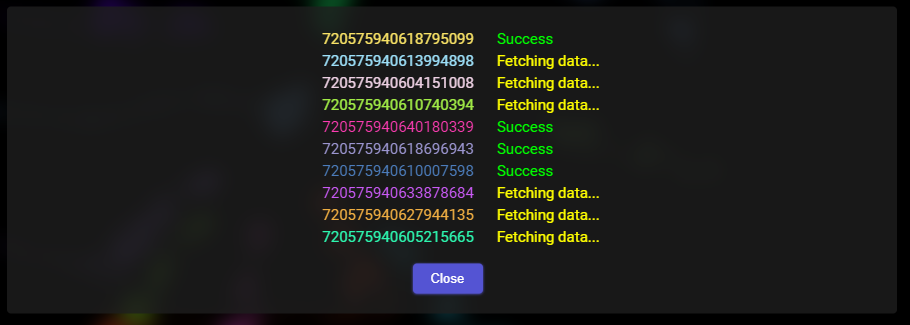
With time, whenever the downloading of the data for a given segment is successful, the window should look like this:

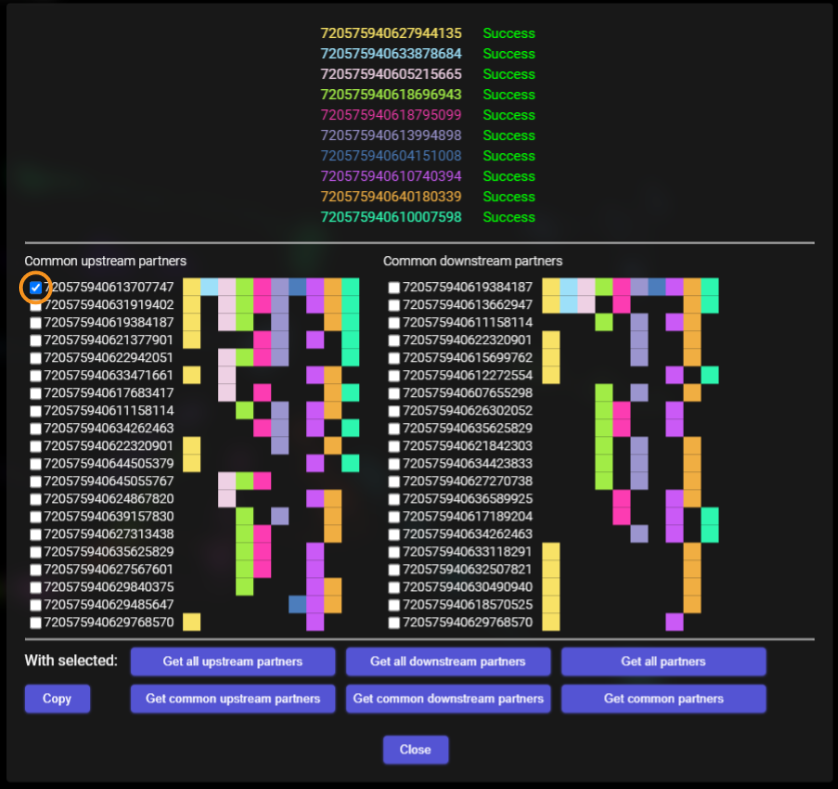
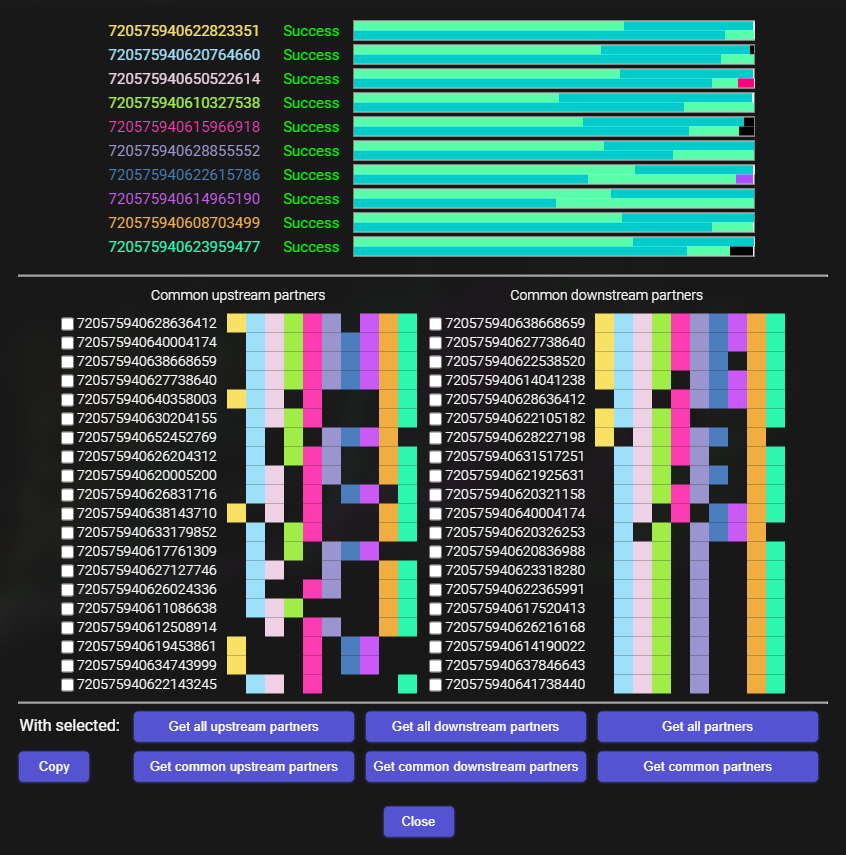
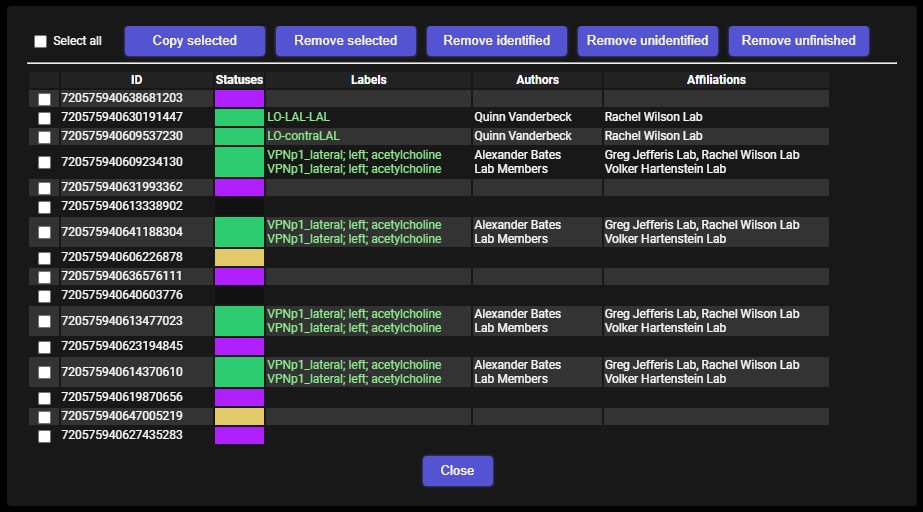
When everything is downloaded, the addon does some extraction and grouping of the data and should present the results in this way:

The segments at the top are, of course, the ones, with which we started.
Below that are two columns - the one on the left is a column containing first 20 segments that are most common upstream synaptic partners to all the starting cells. By most common, I mean, synapses with the most of the starting cells. The column on the right is the same, but for the downstream synaptic partners.
The squares to the right symbolize the starting cells - each color is the same, as the color of the cell’s ID at the top. So, for example, the first common upstream synaptic partner has a colored square for each of the starting cells, which means, it sypanses with all of them. The next one doesn’t have any connection with the first and the fifth starting cell, and so on. Same for the downstream partners.

At this moment you can finish using the tool - select checkboxes to the left of each interesting cell and click the “Copy” button to copy all the IDs to the clipboard.

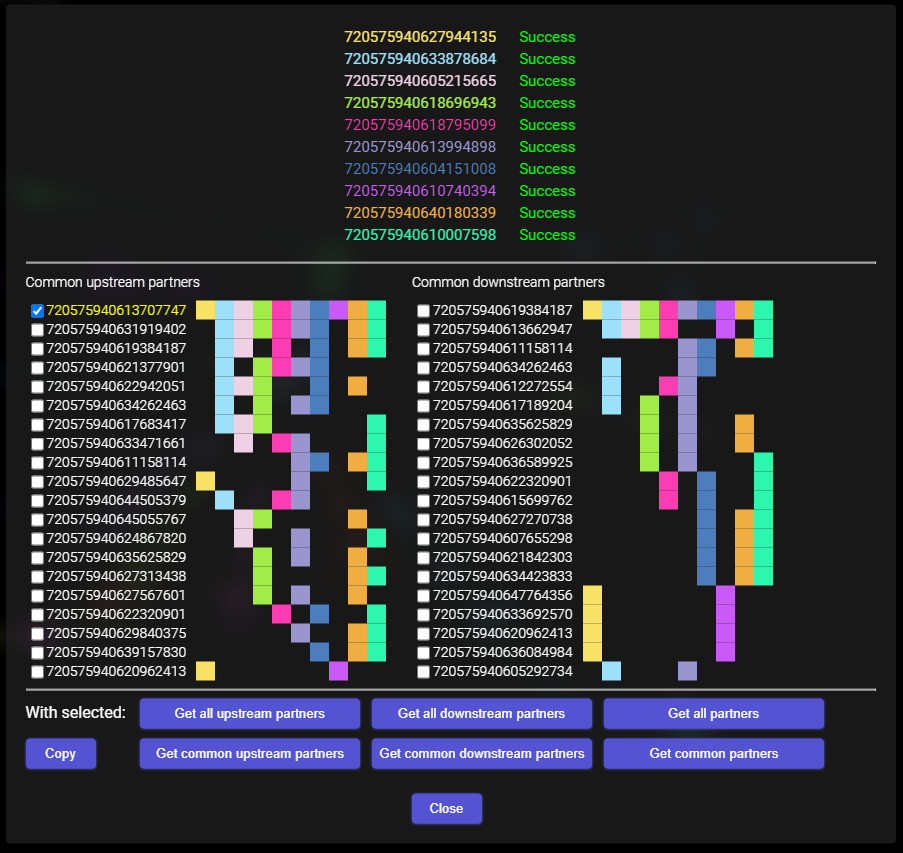
But you can do some further work with the other six buttons at the bottom.
This time you can find various synaptic partners for the newly found cells.
To do this, mark the appropriate checkboxes and click one of the buttons below.
The first row of the buttons will find all the synaptic partners for all the selected cells (all upstream, all downstream, or both). It’ll remove duplicate entries, sort the list in ascending order and show a popup with the number of found cells. You have to click the “Copy” button in that popup and all the IDs will be copied to the clipboard (comma separated list).
The second row is for searching common synaptic partners (again, upstream, downstream or both). “Common” means, that each given ID on the final list is a(n) (upstream, downstream, any) synaptic partner to all of the selected cells. In other words, it’s an intersection of all the sets, where sets are the lists of synaptic partners of the selected cells.
After you’ve selected all the needed cells and pressed an appropriate button, the selected cells’ IDs should turn yellow. It means, the data is being pending/fetched for such cell. If a cell turns green, it means, the data has been completedy downloaded for it. If it turns red, that means, that something went wrong with downloading the data.
When all the cells turn green, you should see a popup informing you, how many synaptic partners has been found. There’ll be a “Copy” button to copy all the IDs to the clipboard.

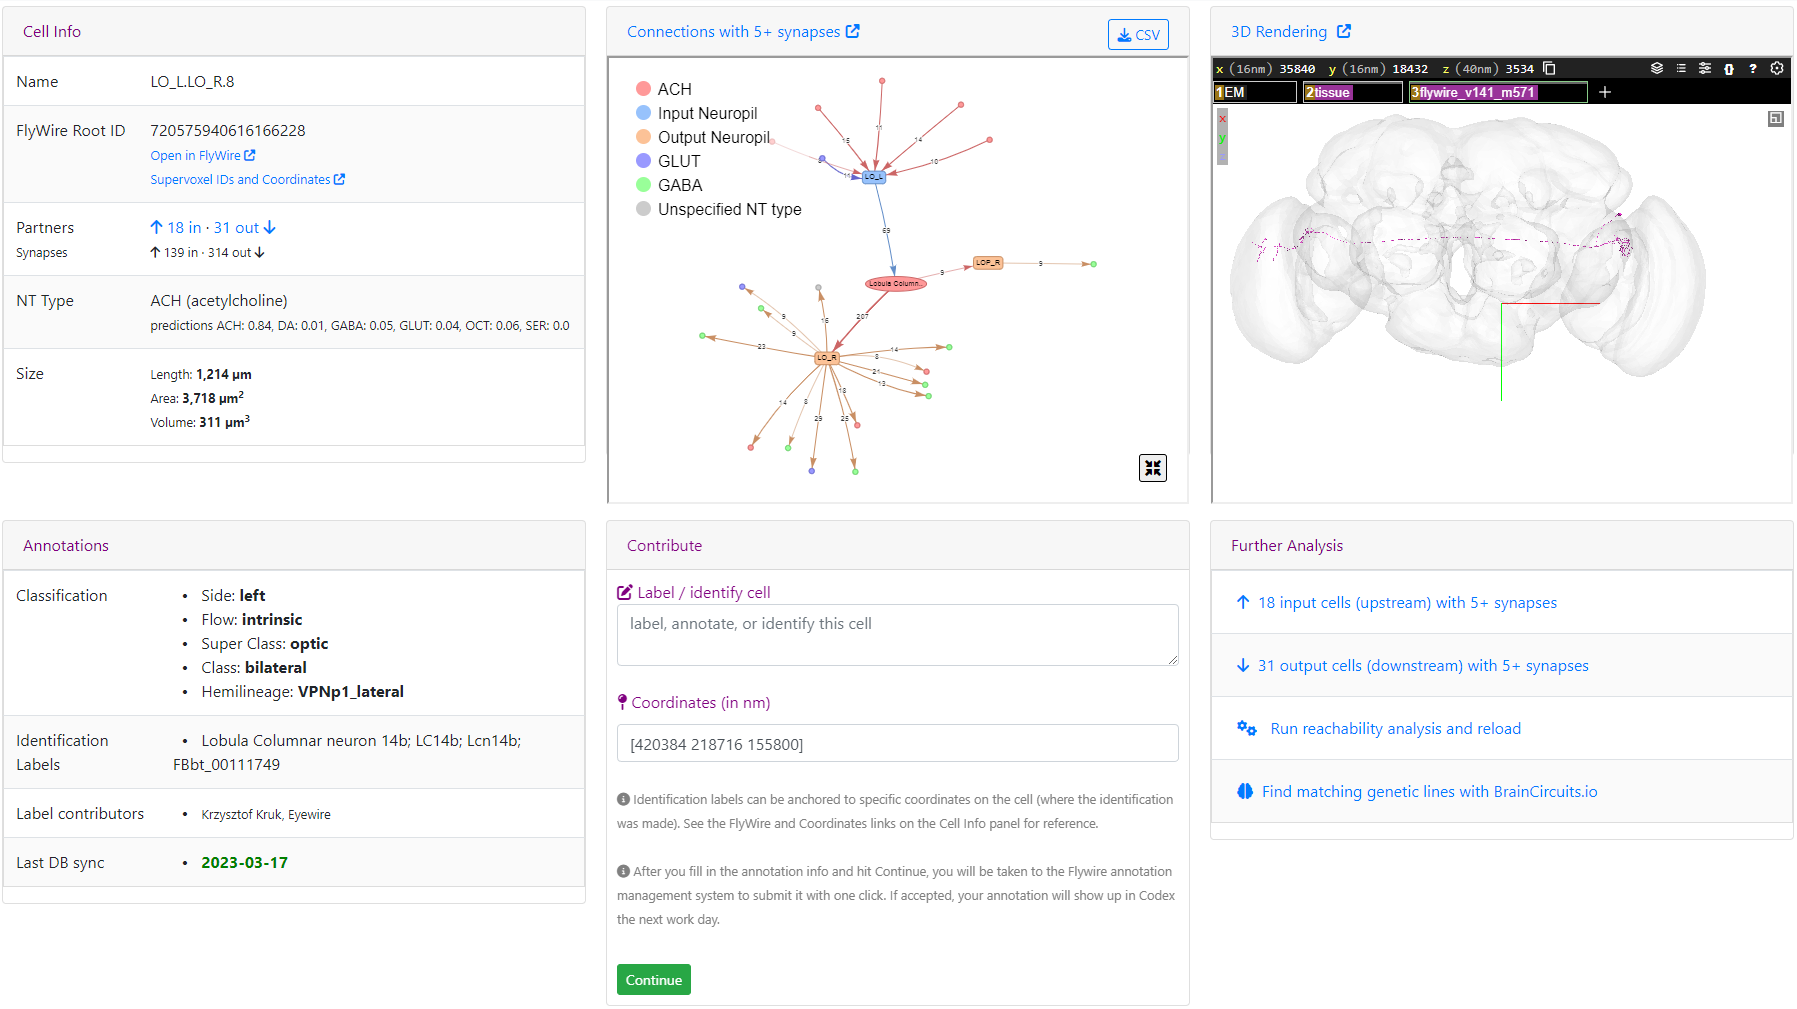
  1. Selected one of the found synaptic partners:

  2. Addon during downloading the data for the selected partner:

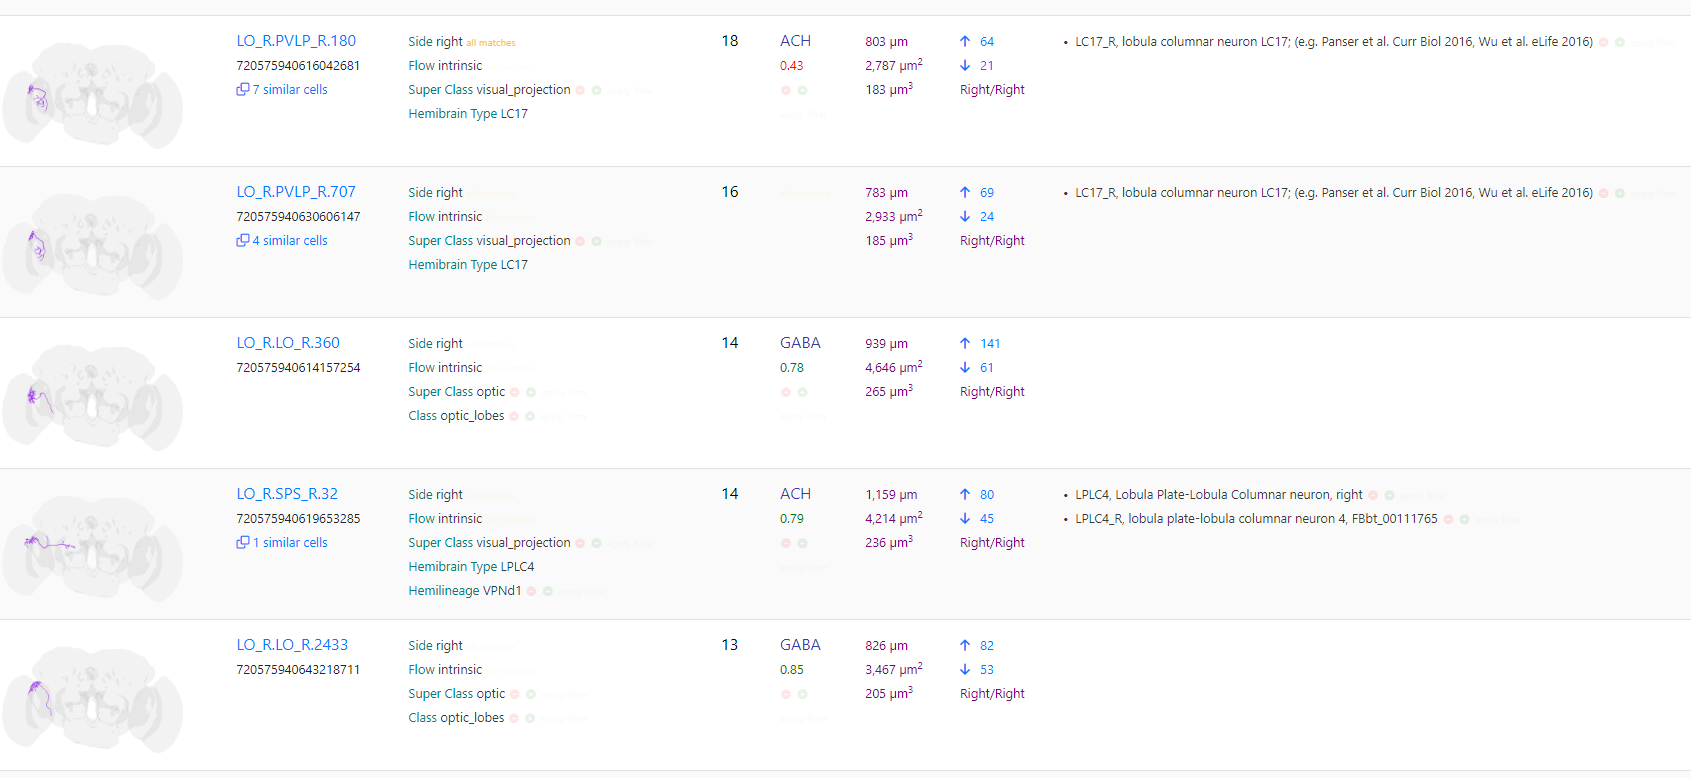
  3. Results found after clicking the “Get all partners”:

Collecting the data at this point might be quite long, because the common cells are usually large ones.The longest time, I had to wait, was over 4 minutes. It was for cell 720575940619384187. And it’s one of the biggest, most complicated cells, I’ve ever seen. It is composed of 8346 chunks, the file with synapses is 24,5MB in size and the segment have already had 5664 changes.

Remember, that the final results are for the selected cells, not for the starting ones.
So, there are 5 levels of connectivity, that you are able to reach (2 upstream, 2 downstream, starting one):

  • starting cells → upstream partners (1 level up from starting cells) → their upstream partners (2 levels up from starting cells)
  • starting cells → upstream partners → their downstream partners (same level as starting cells)
  • starting cells → downstream partners → their upstream partners (same level as starting cells)
  • starting cells → downstream partners (1 level down from starting cells) → their downstream partners (2 levels down form starting cells).

Why did I do this feature?
To find as many as possible cells of the same type.
For example, I can start with 5 Mi1 cells. Then I’ll search for their common upstream partners and for the most common ones, I’ll seach for their common (or all) downstream partners. (or downstream and then upstream). This way, I’ll end up with not only the Mi1 cells, I started with, but probably with most (if not all) the other Mi1 cells (among many other cells, but it’s much easier to filter out, that to search via random clicking on the 2D).

Issues/limitations:

  • Not all errors are currently catched, so some may silently raise in background without informing about it.
  • When searching for synaptic partners of multiple selected cells (from the second part), the highlighting doesn’t always work correct.
  • It’s best not to select more than 20 of the synaptic partners, because there are some limits in browser about max number of concurent downloads.
  • If you had four or more errors (red cells’ IDs), the browser might block you for 15 minutes for further reaching the Connectivity app via the addon. You can read more here: Anti-DDoS HTTP Throttling of Extension-Originated Requests
4 Likes

v 0.2.1

Fixed the highlighting issue (the problem was, that some of the common cells could be both up- and downstream partners at the same time and I didn’t take that into account).

Added some error handling.

Added another color to the data fetching in the second phase. Now there are 5 colors in total:

  • white - nothing is being done with a cell,
  • yellow - connection is pending,
  • orange - downloading has been started,
  • green - download finished successfully,
  • red - an error has occured.

Even, if an error occured, the rest of the data will still be proceeded and results will be shown, so, after copying the results, be sure, that either all the downloads finished successfully, or you’re ok with the red cells’ partners not being in the final results.

Just to make sure I’m understanding correctly -

“copy” - copy checked cells
“get all partners” - returns copyable list containing every partner for all checked cells
“get all common partners” - returns copyable list containing only partners shared by all checked cells

is this correct?

1 Like

That’s right.
And, by “checked”, I’m thinking about the selected cells from the two columns in the middle of the popup.

So far, the only useful part I found, is finding upsteam then all downstream, or downstream then all upstream for the most common cells. For example, it helped me finding almost 400 Mi1, when I’ve started with only 10 of them.
The other combinations (upstream → upstream, downstream → downstream) will will find their own uses. For now, I’ve added them just for the sake of completeness and because it was rather easy to do.

1 Like

v 0.2.2

Fixed incorrect displaying of the results (up- and downstream partners in the middle of the popup), when the number of selected cells at the beginning of the process was bigger than 10 (the results were displayed as narrow vertical bars, rather than as squares).

v 0.2.3

Fixed an issue, that “Find common results” (up/down/both) always returned 0 results.

v 0.3

Added bars showing, what percent of synapses are in which of the neuropils (both incoming and outgoing):

For each of the top 10 cells, there are 2 narrow bars. The top one shows percentages of incoming synapses and the bottom one - outgoing. Both the colors and values are the same as in the Connectivy app (the source of the data). If you hover over any of the bars, you’ll see the name of the neuropil, the synapses are in.

This seems to be useful, if you have a few similar cells and you’re not sure, if they are of the same type - cells of the same type usually have the source and target neuropils’ percentages similar (to a degree)

4 Likes

v 0.4

Moved the neuropils bars to a new feature called “Show neuropils coverage”:

Bez nazwy

Added averages of neurotransmitters both for incoming and outgoing synapses:

This is the same data, that’s available through the Connectivity app, but here it’s aggegated for many neurons.
This kind of data helps determining, if all neurons displayed are in or the same type or not.

Unlike in the previous version, now you can retry downloading the Connectivity data for each neuron, if something went wrong at the first try (Retry button visible on the screenshot above).
If the Connectivity app is working (it often returns some server errors 5xx) and the data isn’t returned after a couple of tries, that might mean, that the neuron is outdated. Update it and try the functionality again.

As with the neuropils, you can hover the cursor over a bar in the neurotransmitters column to see, which bar represents which neurotransmitter.

You can use the buttons at the top to show/hide, copy or remove various rows to select all neurons, you’re interested in.

2 Likes

is there any way to also get a column for type of cell if someone have already identified them?

1 Like

Good idea, I’ll try do it.

2 Likes

v 0.5

Added a new option suggested by @annkri (thanks!) - displaying labels and statuses for neurons.
Now you can go the “–actions–” menu and you’ll see a couple of new options:

menu

There’ll be “Show statuses and labels” category, and you’ll be able to choose, if you want to display that data for all cells or only the visible ones.
The “all” option has also been added to the neuropils (and neurotransmitters) category and to the “Change color for”.

When you click either “visible” or “all” for the “Show statuses and labels”, you should see something like this:

You might have to wait a few second until all the data is loaded. The list should work even it you have hundreds or thousands of cells open in FW. It simply downloads the data in batches of 60 cells.
If there are more than one identifications for a given cell, they all (and their authors) will be shown.

Using the buttons at the top you can perform various operations.
Slight warning: all the "Remove… " buttons will remove segments not only from the list, but also from the FW.

Colors of the statuses are the same and mean the same as the lightbulbs.

1 Like

this will be useful, might have thought wrong about the neuropils coverage option, but what i was really looking for was a option to find partners for one or more starting cells (without loading the partners) and if those partners was already identified this could be helpful in figuring out what kind of cell i was looking at.

For instance i have a few C type cells but not sure if they are C2 or C3. If they connect to a identified L1 or L3 cell it is a C3. Ofc in that example i could have found it out in other ways, but probably useful in other cases.

1 Like

Oh, now I get it.
Yes, that version should also be possible - one query to the Conectivity API, then “synaptic_partners/60” queries to the Cell Identify API.
I’ll work on it next.
Currently I want to find some more M2 cells and label them all, so programming may take a little while.
Of course, I’ll still leave the current version, beause it works for all/visible cells, while checking types of synaptic partners will probably be for single cells.

1 Like

I’ve just found out, that you can use the Codex for this purpose.

Here’s an example of an LC14 cell put into it:
https://codex.flywire.ai/app/cell_details?cell_names_or_id=720575940616166228

You can see all the details about the cell and if you use the in the bottom right corner (Further analysis), you get a list of the incoming and outgoing cells. If a cell on any of that list has been identified, in the last column of the list there will be the label(s):

1 Like

The codex is only useable for any segments not changed after january when the last upload of cells was done.

1 Like

Oh, you’re right. I thought, it’s updated everyday now. Looks like I was wrong.
Anyway, I was still going to do the tool, you said about; just meant the Codex as an intermediate way to find the right data.

1 Like